Split a Song and Put the Drums on Your EP-133
- Pro
You’ve got a track with a drum part you love, but the bass and vocals sit right on top of it. Sample it as it is and every pad drags the rest of the mix along. EP-PatchStudio’s Stem Splitter separates the drums from everything else on your own computer or phone, so you can put just the drums on your EP-133 K.O. II and chop them there.
This guide goes from a finished song to drums on your pads. For every option in the Stem Splitter, see the Stem Splitter reference.
Only split tracks you made yourself or ones you’re cleared to sample.
What You’ll Need
Section titled “What You’ll Need”- EP-PatchStudio with Pro. The Stem Splitter, Upload to Device and the File Manager are all part of Pro, and the 14-day trial includes them.
- A computer running macOS, Windows or Linux, or, from version 1.6, an iPhone, iPad or 64-bit Android phone with about 6 GB of memory or more.
- The song as a WAV, MP3, FLAC, AIFF, OGG or M4A file.
- Your EP-133 and a USB-C data cable (a charge-only cable won’t connect).
1. Get a Splitter Pack
Section titled “1. Get a Splitter Pack”The first time you open Stem Splitter, it asks you to download a splitter pack. You only do this once.
- Pick a pack from Splitter Pack. For drums, either 4-stem pack is the one you want. 4-Stem Splitter Pack (Fast) is quicker and is the usual choice on Macs with Apple silicon, Windows, phones and tablets. 4-Stem Splitter Pack works on every computer.
- Read the pack’s licence, then tick I have read and accept this splitter pack’s licence.
- Select Download 4-Stem Splitter Pack (or the Fast one).
Once it’s installed, splitting works offline and your audio never leaves the device.
2. Pick the Section You Want
Section titled “2. Pick the Section You Want”- Select Browse for an Audio File, drag the song onto Stem Splitter or select Choose from Library.
- Drag the markers on the waveform around the part with the drums you’re after, say an eight-bar break or a chorus. Select at least one second. Preview Selection plays it back.
Splitting a section is quicker than splitting the whole song, and it leaves you less to trim later. If you leave the markers at the ends, the whole song is split (up to 15 minutes at a time).
3. Split It
Section titled “3. Split It”- Leave Bit Depth on 16-bit. The EP-133 takes 16-bit and 24-bit, and 16-bit files are a third smaller, which matters when the device holds 128 MB.
- Select Extract Stems from Selection (or Extract Stems for the whole song).
A full song usually takes one to a few minutes on a computer and longer on a phone or tablet. On a computer you can carry on using the app while it works. On a phone or tablet, keep the app open until it finishes.
4. Solo the Drums
Section titled “4. Solo the Drums”When the split finishes, you see Stems Ready with a row for each stem.
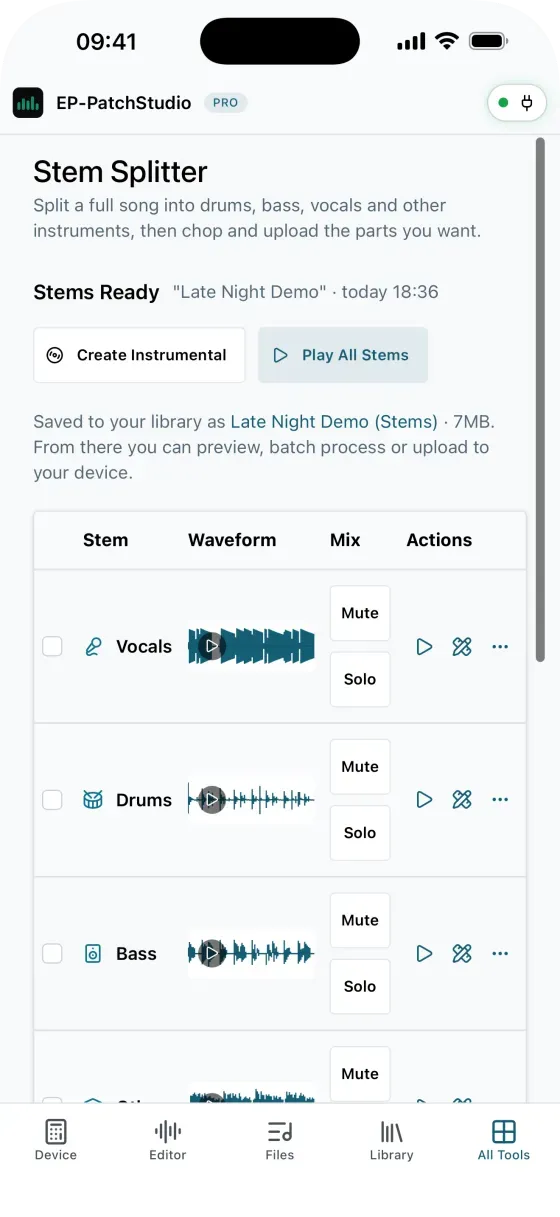
- Select Solo on the Drums row, then Play All Stems to hear the drums on their own.
- Have a listen for bleed. Drums usually come out clean, but a loud vocal can leave a trace. If the part you want sounds rough, try a different section with Split This Song Again.
5. Save the Stems to Your Library
Section titled “5. Save the Stems to Your Library”Select Save to Library. The stems go into your sample library as a pack called “(song name) Stems”. Until you save, they only last for this session, so save before you move on and you can always come back to them.
6. Open the Drums in the Sample Editor
Section titled “6. Open the Drums in the Sample Editor”On the Drums row, select Open in the Sample Editor (the button next to the play button). The drum stem opens in Oneshot mode. If the editor already had unsaved samples in it, the app asks before replacing them (Replace Current Work?).
Stems come out at full length, and the Sample Editor holds up to 20 seconds, so trim it down to the bars you want:
- Drag the start marker to the first hit of the loop and the end marker to where it should stop. Use In and Out under the waveform to check the times, and play it to check it loops.
- Select the crop button in the toolbar (Trim to Sample Start/End Markers) to remove the rest.
- If the editor shows Duration limit exceeded, the sample is still over 20 seconds. Trim some more, or select Trim to fit to cut the end down to the limit.
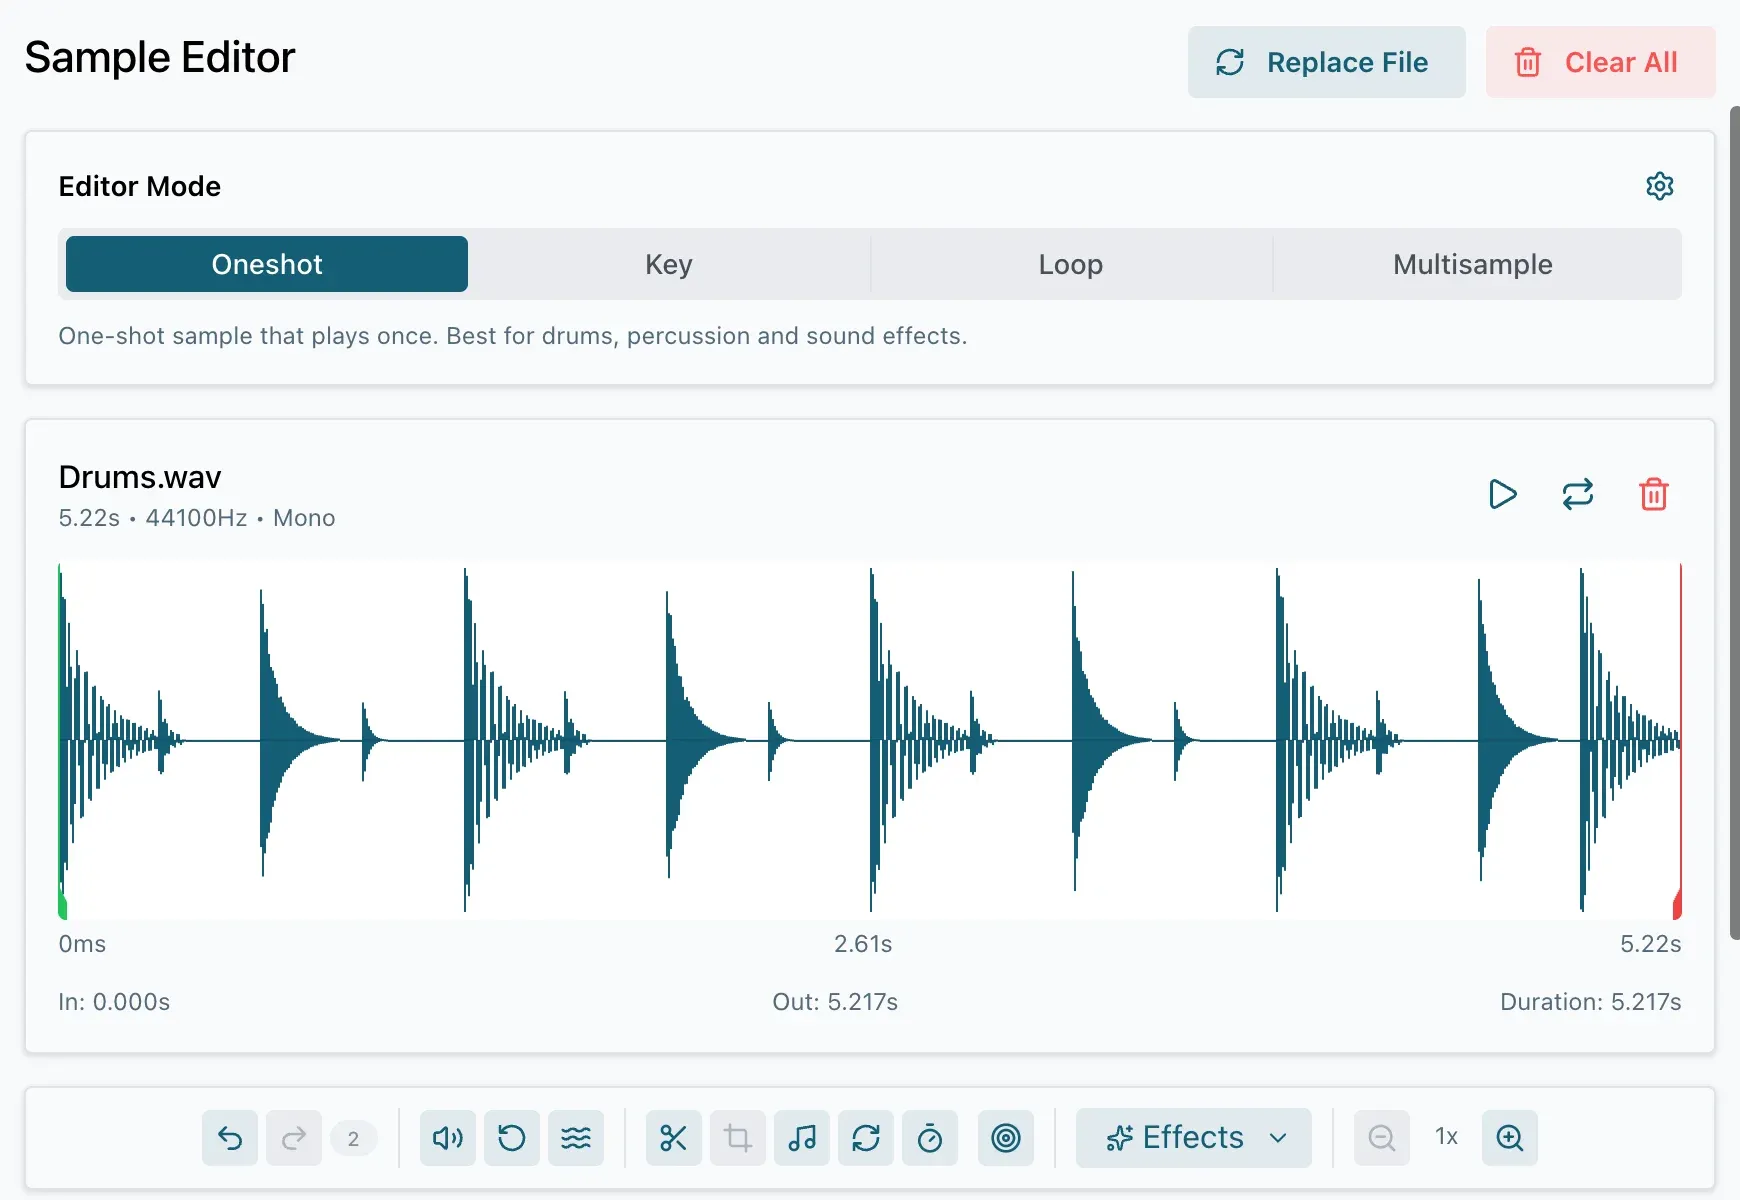
Give the sample a clear name under Output Settings, so you can find it on the device later.
7. Upload It to a Slot
Section titled “7. Upload It to a Slot”- Connect your EP-133 and check the app shows it as connected.
- Select Upload to Device. The app opens the File Manager with Ready to Upload Sample at the top.
- Select an empty slot to upload the drums there. Note the slot number, as you’ll need it on the device.
If you pick a slot that already has a sample, the app asks before replacing it.
8. Put It on a Pad and Chop It
Section titled “8. Put It on a Pad and Chop It”The rest happens on the EP-133 itself.
- Load it onto a pad. Press SOUND, pick a group and a pad, then choose your slot: step to it with - and +, or hold SOUND and type the slot number on the pads.
- Chop it. With that pad selected, press SHIFT + SAMPLE to enter CHOP. Hold the group you want the slices on and use - and + to choose transient slicing or equal slices. The slices fill that group’s pads, replacing what was on them, so pick an empty group.
- Tidy the slices. Press - or + to change how many slices you get, and use the X and Y knobs to fine-tune each slice’s start and end.
Teenage Engineering’s EP-133 guide covers chopping in full, including live chop, where you tap the pads in time as the sample plays.
- Create Instrumental mixes every stem except the vocals, if you want the whole backing track.
- The bass stem is often worth a slot too. Open it in the Sample Editor the same way.
- If memory is getting tight on the EP-133, see How to Fit More Samples on Your EP-133 K.O. II.
Get Started
Section titled “Get Started”EP-PatchStudio is free to download. The Stem Splitter is part of Pro, and the 14-day Pro trial includes it.
EP-PatchStudio is an independent app from SquareWave Studio. It is not affiliated with or endorsed by Teenage Engineering AB.